LIME PAINT FURNITURE TRANSFORMATION
Want to know how to get the Limewash look on furniture? It's easy! Here is how.


Giving a plain piece of wood furniture a soft weathered patina takes no more than a few simple tools and products any beginner can tackle. Simple, step-by-step instructions will help transform your old wood furniture or exposed timber surfaces with Color Atelier Lime Paint.
Here we go!
- Take a before photo of your furniture to show everyone the transformation at the end.
- Remove anything removable such as hardware, drawers and shelves.
- Prep and clean your furniture piece, or whatever wood surface you'll be working on such as beams, doors, cabinets, baseboards.
- Run your hand across the furniture piece. If you feel any rough patches they need light sanding with a fine grit sandpaper. You do NOT need to sand the entire piece of furniture when you use our Lime Paint UNLESS you want to achieve a distressed aged look with less coverage. The pieces we are showing here in this post have full coverage on and did not need any sanding. We will show the distressed limewash finish on a wood surface with a separate blog post next!
- PRIMING is always safe If you are unsure about your wood surface. If it has an oil-based finish on or is super slick and shiny, paint may not stick well. Also, if you are going with a lighter choice of color than the current color of the piece, priming will be efficient. Our Matte Primer for Lime Paint is the recommended primer for use on wood prior to Lime Paint application.
- Make sure your can of Lime Paint is mixed and stirred very well as a natural paint it settles a bit.
- Dip your brush into the Lime Paint. You want to start with a light hand. You really can’t go wrong with whatever stokes you use. Use random multi-directional patterns. Lime Paint will dry to subtle color nuances with a soft weathered patina, similar to on walls. Paint with the grain of the wood. Just remember that the first coat might be streaky, your second coat will fix the streakiness- or you might want to do a third coat depending on the piece.
- Now you're ready for the second coat as soon as the first coat is touch to dry, using the same exact painting steps. Let it dry for 24 hours.
- If you want to distress your piece, use a piece of fine grit sandpaper or a sanding pad and rub it over areas that would get normal wear and tear over time. Edges, corners, legs, knobs detailing, etc This step is NOT necessary UNLESS you do decide to distress.
- Ready for a PROTECTIVE TOPCOAT. We recommend using a topcoat product to protect your pieces for everyday use. Either Sealer or Color Atelier Clear Wax would be easy, and safe products to use on your lime painted wood surfaces.
- Apply the Clear Wax using a lint free cloth in a circular motion until the piece is covered entirely. Leave to dry. OR apply the Sealer with a brush section by section on the lime painted surface. Back wipe any excess sealer and rub in softly using a circular motion with a lint free cloth. One or two coats of sealer are recommended. Allow sealer to dry for about an hour in between coats. The process is simple and quick, simply do not over work it.
- Et voilà! Enjoy your newly transformed piece and don't forget to share your before and after photos with us to be featured.
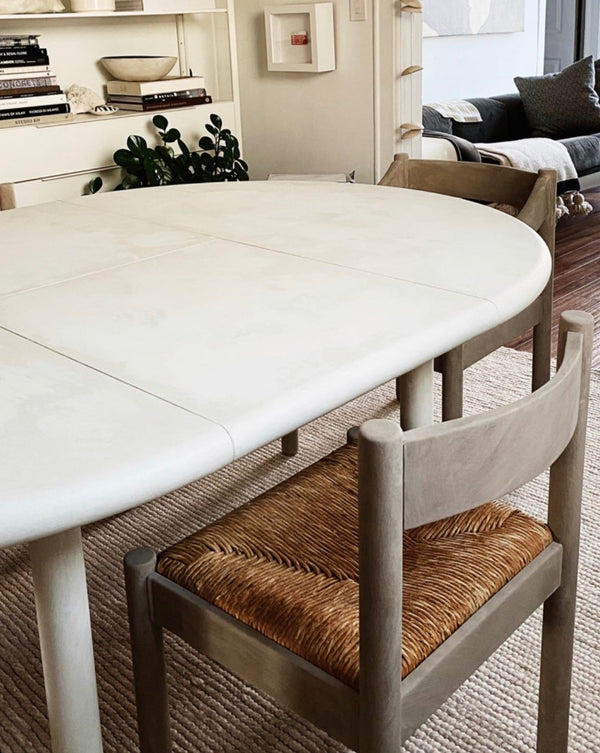
THESE EBAY AND CRAIGSLIST FINDS WERE PREFECT SCALE, PERFECT SIZE, IN GREAT CONDITION, AND AT A GREAT PRICE. EXCEPT THEY WERE PRETTY ORANGE. SAYS DESIGNER NICO CUTLER LEGGET OF DESIGNED BY SOVEREIGN. A MULTI-DISCIPLINARY DESIGN STUDIO. LEGGETT SOURCED HIS CHAIRS AND TABLE ONLINE WHILE REORGANIZING AND REORIENTING HIS HOME OFFICE, AND KNEW THAT HE WANTED TO PAINT THEM WITH LIME PAINT.


LEGGETT SAYS THAT HE ALWAYS LOVED THESE VICO MAGISTRETTI DESIGNED CARIMATE CHAIRS FROM AFAR FOR A LONG TIME. AFTER FINDING THESE VERY FAMOUS CHAIRS DESIGNED BY A VERY FAMOUS ARCHITECT FROM 1960s ON EBAY HE DECIDED TO PAINT THEM- SOMETHING MANY DESIGNERS OR FURNITURE COLLECTORS WOULD HAVE A TOTAL MELT-DOWN ABOUT. BUT HE STRONGLY BELIEVES THAT DESIGN EXISTS TO MAKE OUR LIVES BETTER. IT EXISTS TO HELP US CARVE OUR OWN SPACES OUT OF THE WORLD - AND TO DO WITH THOSE SPACES WHAT WE WISH. BOTTOM LINE; MAKE YOUR SPACE YOUR SPACE, PERIOD.


IF YOU'VE EVER TRIED CHALK, MILK OR CLAY PAINT ON FURNITURE, TRY LIME PAINT AND THANK US LATER. :)
WE'RE OBSESSED!
WE THANK DESIGNED BY SOVEREIGN FOR SHARING THIS BEAUTIFULLY PLANNED AND WELL EXECUTED FURNITURE TRANSFORMATION WITH OUR LIME PAINT WHICH WAS NOT SPONSORED. CHECK OUT THEIR WEBSITE AND INSTAGRAM ACCOUNT FOR THEIR KEEN EYE FOR DESIGN AND INSPIRING WORK.
THANK YOU FOR READING OUR BLOG POST AND WE HOPE THAT YOU ARE INSPIRED.
DON'T FORGET TO SHARE YOUR LIME PAINT TRANSFORMATION PHOTOS WITH US TO BE FEATURED.